Friday, May 18, 2012

Apple 10.7.4 IMPORTANT NOTICE BEFORE UPGRADING!

I had a hard drive issue the other day and decided to upgrade and re-install my OS on a new drive.  I started by installing OSX Snow Leopard and then upgraded to Lion 10.7, which immediately prompted some updates to the OS, leaving me with 10.7.4. My machine is a Mac Pro running 2 X 3 GHz Quad-Core Intel Xenon processors.


To my horror, when I went to install Sorenson Squeeze 5, which is market on the outside package as "Universal" install for Mac meaning it runs on both PPC and Intel architectures.  When you open the folder, there are two installers - one for Intel based Macs (like mine) and one for PPC based Macs.


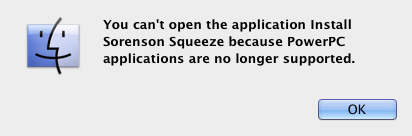
PPC is no longer supported but to my horror, when I tried to install the Intel version, I got the following message.


I got the same behavior with several other "universal" installs so I set up a call with Apple to discuss this, thinking it is obviously a bug.  The call took place at 9:00 AM PDT and I am going to share with you what was said to me.  BTW = if anyone from Apple wants to know who the person was, the case was Express Lane Case 315474064: Scheduled Support Call.    First  the Apple guy told me it was because Lion no longer supports PPC.  I told him that up until the day before, I had my Final Cut Pro and Sorenson running on this same machine with the Lion OSX.  He was unapologetic and told me I just had to just pay Apple to upgrade to a newer version of Final Cut Pro.  My reaction was to put my hands up and say "don't shoot" but I politely suggested this sort of behaviour was not appropriate given the stamp "Universal" means it runs on Intel.   I also told him that by him telling me I had to go and upgrade all my software was akin to robbery.   I told him I was going to blog about this and he got really worried and said he had not said anything and I should refer to the website.    He said "I didn't say that and anything you say you are making up".

Sorry pal.  The truth is the truth and this blog stays here!  That's final.  Nio court gag order will take this down.

Well, I am blogging about because other people might want to know about this.  There is an error and I hope someone from Apple reads this and sorts it out.   Please be warned! 


Dear Apple:  Please explain what "universal" really means?  From their website:

"Now every new Mac ships with an Intel processor. Experience delightful responsiveness from the smallest Mac mini to the most beefed-up Mac Pro. Use one of more than 7,000 universal applications that take full advantage of the Intel chip."

Hmmmm.

Wednesday, May 16, 2012

Adobe LiveCycle ES3 (version 10.0) Download

Adobe has recently announced that Adobe LiveCycle ES3 is available as a download.  This announcement was met with some great enthusiasm by the community, none less than us here at Technoracle.  The brand itself had been subject of much speculation regarding it’s future and we are happy to see the investment into LiveCycle continue.  This re-invigorates our own investment to work with this excellent SOA platform.

Having now been accepted into the Adobe Enterprise Solution Partner Program, we are extremely excited to be amongst the first in the world to offer you, the customers, the ability to purchase Adobe LiveCycle ES3 and professional services around it, starting from initial project consulting to complete project management.  In case you haven’t heard, there are several new features that many enterprises have asked for.   Our great former colleagues Jeff Stanier and Dave Welch have done a spectacular job of making this release a “must have”.

LiveCycle ES3 first and foremost incorporates the Data Services ES3 module (version 4.6.1), an optimized Java server framework that can enhance and simplify the development of rich, data-intensive enterprise and mobile applications.  This includes several mobile platforms such as iOS, Android etc.

ES3 also offers a new SAP to Java connector for creating front-end interfaces to SAP systems. Alongside this update are connectors for FileNet 5 and easier SharePoint server farm deployment and integration.

Our favorite new feature is within LiveCycle Designer.  When you add a new submit button, Designer allows you to select an encryption method and choose from from several XML encryption/decryption algorithms.   This will help with many accounts we are currently working on.
Out mobile MEAP-lite platform is also a good way to add custom mobile functionality for wireless device integration into business process.  Companies like Uberity have already released a great free and open source mobile SMS module including the full source code and binaries at http://blog.uberity.com/2012/02/extending-adobe-livecycle-es-to-use-sms-in-business-processes/

So why wait?  Get started today.   Contact us, a company founded by former top LiveCycle ES rock stars and engineering managers.  Leave a omment if you wish to inquire about our services around LiveCycle ES3.

Tuesday, May 15, 2012

Neo4J Tutorial #4: Registering a shutdown hook

In the previous tutorials on Neo4J, we discussed what Neo4J is, how to start it and use Cypher for basic queries and getting started with Neo4J and Java.  In the third of these, we had hinted there are some things you should do that are best practices in a proper environment.

To start this tutorial, please first follow the 3rd of the series from http://technoracle.blogspot.ca/2012/05/third-neo4j-tutorial-getting-started.html

You' notice that on Neo4J's pages, they discuss a shutdown hook.  So what exactly is that and why would anyone use it?


If you examine the code on the previous tutorial, you will see that you can shutdown a database by simply calling grapDB,shutdown();  These lines of code are shown above.  Note that calling shutown() only tries to shutdown the database.  The Shutdown hook simply ensures that the database shuts down cleanly.

To add a shutdown hook to the code in the previous tutorial, navigate to the createDB() method and register a shutdownhook handler right under the line where you create the database.  With the new line added, your code should look like this:


At this time, you may notice red X's as this introduces errors into the project.  We have registered a shutdown hook which takes a single argument of  the graphDB instance it will register the hook for.  Now it is time to write the hook.  


registerShutdownHook() is a static method that returns nothing (void).  The syntax above is a bit confusing given line 91 calls addShutDownHook on a new thread and closes around line 99, hence the erroneous looking but much required "});" syntax.  This essentially encapsulates the functionality.    The shutdown hook ensures that the Neo4j instance shuts down nicely when the VM exits (even if you "Ctrl-C" the running instance before it has finished running.  Try running this example now with the modifications and you should see the following print out in your console.


Tuesday, May 08, 2012

Third Neo4J Tutorial: Getting Started with Java

In this tutorial we will learn how to talk to Neo4J using Java.  There are a few tutorials from Neo Technologies which are very useful however I have my unique style of teaching and want to explain this technoracle-style.

First, if you haven’t already familiarized yourself with Getting Start with Neo4J and the Getting Started with the Neo4J Cypher Shell, check out those two articles.

Here are the steps to communicating with Neo4J from a Java environment.  This tutorial should take you about 30 minutes to complete.

SETUP

1.  Ensure you have the right version of Java and the Java JDK environment set up properly. On a Mac, this is probably already done for you. On a PC, you might have to manually download and install the right version of Java and set the PATH and JAVA_HOME environmental variable from scratch. 

2. Download and install Neo4J. In this tutorial I am using Neo4J 1.8 M01 release. I installed it on my OSX 10.7.3 laptop under my home directory (/Users/dnickull/Software/Neo4J_1.8/)

3.  Ensure you have the correct version of Eclipse installed. For this tutorial, I downloaded Eclipse Indigo Service Release 1, Build id: 20110916-0149.  I use the version entitled Eclipse IDE for Java EE Developers.

STARTING THE PROJECT

4.  Within Eclipse, select File -> new -> Java Project and give the new project a name. In my case I m calling mine “Neo_1.8”. Select Next.

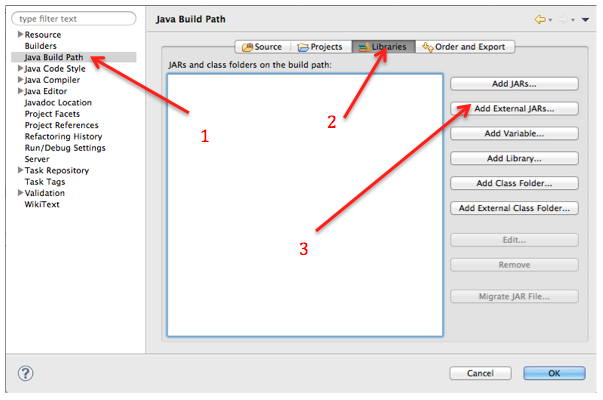
5.  Under the second new project page, select Java Build Path (1) the libraries tab (2) and then click on Add External Jars (3). This will allow you to browse for external jar files.


6. Browse to the directory you installed Neo4J under and look under the “libs” directory. 


 7. Click on one of the *.jar files under that directory and hit the mnemonic key to select all (Command –A on OSX, Control A on PC). Click Add and Finish (even if you're not from Finland ;-). 

 8. In Eclipse, right click (Control click on PC) on the “src” folder of your newly created Eclipse project and select New -> Package. In the dialog window, add a new package name. In the figure below, I added com.technoraclesystems.neo4jutils. Hit the Finish button.


9. Right click (PC) or Control Click (OSX) on the newly created package name and select “New -> Java Class”. Provide a name for your class. In the example below I created a public class called HelloNeo4J.  Click Finish


10. Add the following import statements into your project.


11. Next we have to create the path to the actual Neo4J instance you installed. This is done with one line of code. Just below the class declaration, add the following line replacing the path with your path to the Neo4J 1.8. Note that the path on a PC will use the “\” chafacter instead of the “/” character and you will also have to escape it by placing a second “\” in front of each path separator.  THis should be the first line under your public class HelloNeo4J { statement.


12. For this simple tutorial, we will create 5 new class member variables as shown below on lines 19 - 23. Note that I have closed the imports statements but Eclipse keeps the lines numbers intact.


13. The variables will be used as follows in the program.
          a. myString – concatenates various strings to print back to the console
          b. graphDB – an instance of Neo4J to work with
          c. myFirstNode – a neo4J node
          d. mySecondNode – a second neo4J node
          e. myRelationship – the simple relationship between the two nodes.

 14. The next item to create is a static method to declare the list of relationships In this case we are using the word “KNOWS”, which sub-types the neo4J interface RelationshipTypes (API Docs).


15. A relationship type is mandatory on all relationships and is used to navigate the node space. RelationshipType is in particular a key part of the traverser framework but it's also used in various relationship operations on Node. RelationshipType is designed to work well with Java 5 enumerationss. This means that it's very easy to define a set of valid relationship types by declaring an enum that implements RelationshipType and then reuse that across the application.

16. Now we need to implement our main() method. The main method has 3 basic parts. The first is to instantiate myNeo4JInstance, an embedded instance of Neo4J. There are then consecutive calls to createDb(), removeData() and shutdown().  Add the stub code for these methods.


17. The first method to complete will be the createDb(). Add the following lines of code to this method.

NOTE: This is a bare bones, minimal tutorial.  In production, there are several other items to take care of such as registering a shutdown hook to ensure the database stops properly.  This would normally be done at this stage.  Read more about the importance of the shutdown hook here http://docs.neo4j.org/chunked/stable/tutorials-java-embedded-setup.html


THE TRANSACTION 

18. The first line calls the GraphDatabaseFactory method to create a new instance of the embedded Neo4J which takes one argument, the DB_PATH we set up earlier.  The second line start a new transaction named tx.


19. The next line will set up a new Transaction with the identifier “tx” and calls the graphDB’s createNode() method. The transaction basically has two main parts:

 try { 
        //Some logic 
         tx.success 
       } finally { 
         tx.finish(); 
 } 

20. The idea is that your application logic goes under the try. All your application logic should be executed before the tx.success() statement. If all goes well, tx.success marks the transaction as successful but does not actually commit it. This is only done when tx.finish() is called. If tx.falure() is thrown during the logic phase, the database is rolled back. This is about as simple and elegant as it gets.

Here is how our logic will go to create a very simple graph of two musicians who know each other.


21. Lines 44 and 45 set properties for myFirstNote while lines 46-47 do the same for mySecondNode.  Starting on line 49, a relationship is created between those two nodes using the type from our Java enum, namely "KNOWS".  This is all printed to string before tx.success() is called.  tx.finish() is where the transaction is actually committed.

22. Next we will tackle the removeData() method, which will be executed next in the main method. This essentially undoes all the work we just completed. Modify the contents as follows. Note that this uses the exact same transaction construct as when we created the database.


23. Line 70 basically provides a start context for the transaction by looking for myFirstNode and calls the delete() method on the relationship.    The same delete() method is then called on both other nodes.

24. The last portion of the code to write is to shutdown the database. Luckily once more the engineers from Neo4J have provided a great method for doing this, aptly named shutdown().


RUN THE PROJECT

25. That is it!  If you run your project, all should go well and you should see the following in your console.


If you would like the source code for this project, please email me duane at nickull dot net.  Also, this is very important to remember.  This is a very basic tutorial.  It is very important to learn about other methods and hooks such as the synch hook, shutdown hook and how to clear the database in order to use Java safely with Neo4J.  There is a great tutorial at http://docs.neo4j.org/chunked/stable/tutorials-java-embedded.html that explains more and the Java API docs are at http://api.neo4j.org/1.8.M01/.

SOURCE CODE

package com.technoraclesystems.neo4jutils;

// From the //neo4j_install_dir/lib directory
import org.neo4j.graphdb.Direction;
import org.neo4j.graphdb.GraphDatabaseService;
import org.neo4j.graphdb.Node;
import org.neo4j.graphdb.Relationship;
import org.neo4j.graphdb.RelationshipType;
import org.neo4j.graphdb.Transaction;
import org.neo4j.graphdb.factory.GraphDatabaseFactory;

public class HelloNeo4J {
    private static final String DB_PATH = "/Users/duanenickull/Software/neo4j-community-1.8.M01/";

    String myString;
    GraphDatabaseService graphDb;
    Node myFirstNode;
    Node mySecondNode;
    Relationship myRelationship;

    private static enum RelTypes implements RelationshipType
    {
        KNOWS
    }
    
    public static void main( final String[] args )
    {
    
        HelloNeo4J myNeoInstance = new HelloNeo4J();
        myNeoInstance.createDb();
        myNeoInstance.removeData();
        myNeoInstance.shutDown();
        
    }
    
    void createDb()
    {
        graphDb = new GraphDatabaseFactory().newEmbeddedDatabase( DB_PATH );

        Transaction tx = graphDb.beginTx();
        try
        {
            myFirstNode = graphDb.createNode();
            myFirstNode.setProperty( "name", "Duane Nickull, I Braineater" );
            mySecondNode = graphDb.createNode();
            mySecondNode.setProperty( "name", "Randy Rampage, Annihilator" );

            myRelationship = myFirstNode.createRelationshipTo( mySecondNode, RelTypes.KNOWS );
            myRelationship.setProperty( "relationship-type", "knows" );
            
            myString = ( myFirstNode.getProperty( "name" ).toString() )
                       + " " + ( myRelationship.getProperty( "relationship-type" ).toString() )
                       + " " + ( mySecondNode.getProperty( "name" ).toString() );
            System.out.println(myString);

            tx.success();
        }
        finally
        {
            tx.finish();
        }
    }
    
    void removeData()
    {
        Transaction tx = graphDb.beginTx();
        try
        {
            myFirstNode.getSingleRelationship( RelTypes.KNOWS, Direction.OUTGOING ).delete();
            System.out.println("Removing nodes...");
            myFirstNode.delete();
            mySecondNode.delete();
            tx.success();
        }
        finally
        {
            tx.finish();
        }
    }
    
    void shutDown()
    {
        graphDb.shutdown();
        System.out.println("graphDB shut down.");   
    }   
}


Enjoy and have fun!

Thursday, May 03, 2012

What is LiveCycle ES


I get asked all the time – “What is LiveCycle ES”? This is a question I had to answer while at Adobe but somehow the way this question is answered now has changed from an outsider perspective.   I find myself describing it in terms of business capabilities and value rather than the technology itself. Nevertheless, if you want to know what LiveCycle is, this blog post should provide a solid background.
LiveCycle is an enterprise software system that solves problems pertaining to mass scale processing of Portable Document Format (PDF) documents. While individual users of PDF’s tend to use Adobe Acrobat or Reader for working with PDF, LiveCycle is meant to aid the processing of tens of thousands of LiveCycle PDF documents. Hence, it is an enterprise solution that anyone who currently uses paper forms should look at if they are wanting to streamline the ingestion of data from forms. Likewise, it had many modules that can mitigate problems around PDF such as document security (think of Wiki-leaks).

LiveCycle itself is comprised of several components. I’ll walk through each of these components one at a time. the main component is akin to what many call an Enterprise Service Bus or ESB for short. This includes a set of common services, a common environment of service execution, a registry-repository system, workflow and storage components to name a few components. LiveCycle ES installs as a server and the server can bind to many different types of common enterprise infrastructure components including directories (LDAP for example). Below is a depiction of the server side component of LiveCycle ES.
What is Livecycle - the server component explained.

The server’s core services are all registered in a registry.  There can be orchestrated and used to perform different types of operations on PDF documents and with extensions, to also talk to mobile (wireless) devices.  At the bottom of the Service tier is a Service Provider Interface (SPI) which is where back end systems often integrate.  Systems such as SAP that might consume and produce massive amounts of data for government or finance could link in to this layer to offer PDF forms as a point of interaction with humans, then automatically accept, validate and consume the form data provided by the user.  The users themselves can access data (by requesting a PDF form or perhaps by being pushed notifications of events) via the Service Invocation Layer at the top.  This is a J2EE server and can be set up in many different ways.  One option is often to install it on site however for evaluation, I have found that using the Amazon cloud is one of the best ways for evaluation.  I have experience with this and we have found that while it takes an average first time installation of LiveCycle’s server on Red Hat Enterprise Linux with full SSL/TLS configuration and testing afterwards to take many over 2.5 days.  I highly recommend the turnkey Windows server installation however I do offer a flat fee to install this on the cloud for evaluation.


So what are the core component and services LiveCycle offers?   Here is a brief rundown.  The following is not an exhaustive list, rather an example to help explain what LiveCycle is.


Forms ES – this module can be licensed to automate just about every aspect of forms processing.  The ability to save money over paper forms is astounding. 


Barcoded Forms ES – the barcoded forms module allows forms to be printed with a corresponding 2D bar code that can later be electronically scanned to recapture the form data electronically.  This is useful if you wanted to create something like an electronic voting system that had a fully audit able paper trail or if you needed someone to electronically fill out a form and sign it then mail it in to you for ingestion into your systems.


Digital Signatures ES – since many companies use digital signatures now, often deemed more reliable and audit able than wet ink signatures, PDF documents support this feature.  The LiveCycle Server can perform massive scale operations using the Digital Signatures module like validating 100,000 signatures to ensure certificates have not been revoked.


Output ES – Our put is used often for production print.

PDF Generator ES – this module provides almost every possible method for generating PDF, PostScript, FXA, XDP or other related files.

Process Management ES – LiveCycle ES contains a full blown business process management capability.

Reader Extensions ES – this module of LiveCycle unlocks features in Adobe Reader that enable it to perform more like Acrobat.  These extensions are often cheaper as a solution than forcing all users to buy copies of Adobe Acrobat.


Rights Management ES – Rights Management is one of our favorite modules.  You can use this to protect documents from beign distributed beyond what you want and even expire a document. The perfect solution to Wikileaks! There are many other modules and this is only designed to show you a small cross section of LiveCycle.

So what does LiveCycle look like when you use it?  This is actually very dependent upon your role.  There are Adminstrators and other various types of power users.  This group use the administrative console which is web based.
 
The Adobe LiveCycle ES Administrator view


Most people who work with received forms or kick off business processes will use the Workspace interface.  This is where privileged users can also receive work that has been queued up for them to work with.

  LiveCycle Workspace

For users who design actual PDF forms, this class will spend a lot of time in the Adobe LiveCycle Designer view. If you have ever wonder “what is LiveCycle Designer”, this is what you will see.

Adobe LiveCycle Designer

Another class of developer users for LiveCycle will bind these PDF forms into Business Processes.  These users will spend a lot of time in LiveCycle WorkBench.  This is an eclipse based environment where business processes can be designed by using assets (such as the form above) in combination with business logic and LiveCycle Services.  This view looks similar to the graphic below.
 
LiveCycle Business Process view


Finally, the Business process users will also rely on a set of services.  The view to these services are provided via the service registry.  The service registry interface is easy to use and will be the subject of future Educational Series videos that show LiveCycle Help.

What are LiveCycle ES Services? This blog post only covers the basic elements of LiveCycle ES.  To put all the pieces together, this is what a fully implemented architecture could look like. LiveCycle ES Architecture with Uberity Mobile Deployment

As you can see, the development tools also include Java IDE’s such as Intellij and Eclipse.  I have produced a few LiveCycle tutorials on how to invoke LiveCycle from a Java environment using Eclipse and the LiveCycle SDK.  These are available at: The setup video is here:

http://www.uberity.com/2012/03/uberity-video-education-series-livecycle-es/

and a video of how to migrate from EJB invocation to SOAP is here:

http://www.uberity.com/2012/04/tutorial-invoke-livecycle-es3-using-soap/

Also shown above is the fact that third parties can develop their own functionality around LiveCycle ES.  I've decided to spend some time building mobile interactions that integrate with the Adobe LiveCycle ES3 platform.  


The next time you hear someone ask “What is LiveCycle”, this is a blog postI hope will help others answer that question. As with all our posts, if you do not feel your questions are answered here or want to follow up, please contact us at duane at nickull dot net for more information.  My experience can save your company money. I can show you how a forms initiative will be more successful on LiveCycle ES than any other platform.  Whether it be a PDF form, HTML5 or custom native iOS application, my friends and I are here to help.

Friday, April 27, 2012

A Tribute to Todd Simko

I was planning on continuing my series of blog posts today on Neo4J however I was saddened yesterday but the news of the death of Todd Simko.  Todd was once the members of one of my favorite bands (Pure) and also someone whom I had the joy of working with in the studio.  This photo was taken the last time we were together with John Webster recording our second studio album at mushroom studios.  Todd Simko has a credit on 22nd Century's 2011 "Where's Howie!??" but the words "mastered by Tom Simko" just don't do him justice.


Left to right - John Webster, myself (Duane Chaos) and the late Todd Simko.


I clearly remember this day.  We were trying to do the final mixing of the song Runaway and John kept blowing fuses and getting frustrated.   The studio runner (Alexis) went out and came back with some fine French wine which we made short work of.   I distinctly remember John Webster repeating "keep that stuff away from the mixing console you two" about every five minutes.   These were good times.  Just guys, hanging out doing music, there was no time, we were all in the present and enjoying that special moment.  Todd, may you rest in peace.  Your inspiration to so many of us will never die.  Thank you for the gifts and memories you gave us both in person and on stage.    Your style inspires today and your friendliness is infectious.

Addendum:  Todd's wife issued a statement which I will repeat here:

"Minna Simko has offered the following statement on Facebook concerning her husband's passing:

"Todd may your soul be finally at peace. You are not only the most fantastic father and husband one could have, but also you were also a great friend, musician, teacher, guide, mentor and music engineer.

"The music community has suffered now a great loss and talent. Not only did you touch all the hearts of people in music but also in the lives of family, my peers and especially our daughters friends and family. You will forever remain close by in our hearts and you will be greatly missed by all."

Thursday, April 26, 2012

NEO4J - Installing, Running and the Shell!

Yesterday I write a brief intro to Neo4J and promised to write more.  Yesterday's post focused in on what a Graph Database is.  Today we'll actually download and install the software itself.  First, and I know you all hate this part, please make sure you have the pre-requisites installed.  The people who write most software today all take time to document this so you get to have a better experience.

For reference, the machine I am on is a Mac Pro, 12 GB RAM and running OSX 10.7.3. It has 2 X 3 GHz Quad Core Intel Xeon processors so it should make short work of anything I through at it.  My machine is Unix based so please modify the instructions based on your operating system.  Linux users will be roughly the same.

1. Grab your browser (Chrome of course) and point it at http://neo4j.org/download/

2. There are a variety of options open.  Unless you want to start with the über - enterprise version or build Neo4J Community from GitHub source, simply grab the latest stable version.  In this case it is the Community (ie "free") version 1.7.  If you have a slow connection, use the time wisely to view Emil's video while the download completes.  You will have to choose a location for the download.

3. Unpack the source with whatever tools your Operating System provides.  Once unpacked, it will look something like this:


4.  To start Neo4J, it is quite easy.  Grab a terminal (Shell) and navigate to the <neo4J_Home_Directory>/bin directory and type in sh ./neo4j     This will give you a list of available options for starting the database as shown below:


5. These are very  simple and self explanatory.  To start neo4J, simply type in sh ./neo4j start 


6. There are two ways to verify the neo4j instance has started.  the first is to type in the command sh ./neo4j status which gives you a simple acknowledgement that it has started and the process ID (Unix based systems).  A second, more verbose set of details, can be retrieved by typing in the command sh ./neo4j info   This gives you a wealth of information including every jar in the CLASSPATH, JAVA_OPTS (options), the environmental variable JAVA_HOME, the NEO4J_INSTANCE which is a path to the current instance, the server PORT it is using over HTTP and the NEO4J_HOME environmental variable as well as the current JDK value.  


Validating the port is fairly easy.  Just grab your handy browser (Chrome please) and go to http://localhost:7474 (unless you've already changed the configuration file to a different port).  YOu should see a newly initalized databased as such:


So where can we configure these?  Let's start with the JAVA_OPTS.  YOu will see a line that looks like this -Dorg.neo4j.server.properties=conf/neo4j-server.properties The first part of this configuration starting with -Dorg.neo... is specified within a file that is under the /conf directory named neo4j-wrapper.conf.  The JVM parameters are all specified here but are actually pointers to other configuration files.  If you open this fine, you will see the same lines here:

wrapper.java.additional.1=-Dorg.neo4j.server.properties=conf/neo4j-server.properties
wrapper.java.additional.2=-Djava.util.logging.config.file=conf/logging.properties
wrapper.java.additional.3=-Dfile.encoding=UTF-8

Note that on OSX, the Java Version simply says "CurrentJDK" which is pretty bloody useless.  If you really want to know the JDK version, use your command window and type in java -version.  In my case I am running
 java version "1.6.0_31"
Java(TM) SE Runtime Environment (build 1.6.0_31-b04-415-11M3635)
Java HotSpot(TM) 64-Bit Server VM (build 20.6-b01-415, mixed mode)

Within the neo4j-wrapper.conf there are several properties such as the initial and maximum  java heap sizes along with some warnings.  It is probably a good idea to become familiar with the warnings before you go about tinkering with these settings.  The one I found useful was to be able to uncomment line 10 to allow garbage collection logging.  This data can be valuable in determining what is going on under the hood so I change it with every install. 

This information is important for the next steps when we will embed neo4J into an Eclispe project.  For today, let's play with our new Neo4J instance.  In order to get the neo4j shell, simply type in the command (under the same <neo4J_Home_Directory>/bin directory) sh ./neo4j-shell  This will now enable you to look around at some of the available options.  Type in help for a list of commands.


The shell commands are all well documented at http://docs.neo4j.org/chunked/stable/shell-starting.html.  Note that the shell is configured and enabled from the configuration of the Neo4j kernel (again in the /conf folder).  Okay - enough foreplay.  Let's make some nodes!  Build your first few nodes ny using the mknode command.  I can make two nodes, one with my name and one with my wife's name as such.

neo4j-sh (0)$ mknode Duane
neo4j-sh (0)$ mknode Bettina

If I go back and check the browser aimed at http://localhost:7474 it will confirm that now in addition to the root node, there are two additional nodes for a total of three.  Congratulations.  You have just made some nodes!  So how do you get to those nodes?  This is why I started the documentation on Technoracle.  I found it confusing using the neo4j-shell since almost every command resulted in an empty query until I read the documentation (an engineer's last resort).  The GraphDB works almost exactly like a unix filesystem which means your learning curve should be tens times faster (assuming you're familiar with unix commands).  When you invoke the shell, you are basically in the "~" directory or "me" as the neo4J folks call it.  To traverse somewhere (to Duane or Bettina for example, you need to make a relationship using the mkrel command.  It is very simple.  Type in the following, 

mkrel -ct KNOWS Duane

Now let's dissect this.  mkrel is the command to make a relationship.  There are two variables "-ct".  C should be supplied if you are creating a new node (the wording is a bit rough to read using the "man pages and it took a while to figure out that a a relationship is basically a node as well. 

If you want to nuke the graph, you can also do this using rmnode to delete nodes and rmrel to delete relationships.  rmnode comes with a nasty little flag -f which has the same effect as the unix command "su rm -r *" which removes everything.   As you probably guessed, using rmnode with the -f flag was irresistable and I had to try it so I typed in rmnode -f.  Now beware, this removes all including the current node.  Once you run this and try an ls, the return will be a question mark since there is no current node (or at least it didn't seem to be reachable.  After running this you get:

neo4j-sh (?)$ ls
Node <ref> not found

To fix this, simply create a new root current node.  You can even use JSON to give it a more robust meaningful name.

neo4j-sh (?)$ mknode --cd --np "{'name':'me'}"
neo4j-sh (me,10)$ 

Don't ask me why I do stuff like this.  I think I just like to explore what is possible and how to recover before doing any serious work.  


Earlier we created nodes that had no relationships we could traverse.  Now we will use a different syntax to create new nodes we can reach.  This easier way to create new nodes you can traverse to using the shell is to use the mkrel command.  This command can actually create the new nodes as well as the relationship between the current and newly created node.  To do this, type in the following:

mkrel -t LOVES neo4j and then type in ls into the prompt after that has finished.


Ta-da!  You can now traverse the node using the trav command.  The traverse command is very complex and can build very powerful statements and filters.  For this lesson, all we want to do is go from the current node to the node we just created (node 11) in this case.  To do this, use the syntax

trav -o depth -r LOVES:both,HAS_.*:incoming 

trav = traverse
-o depth = the traversal order.  The only possible values are BREADTH_FIRST DEPTH_FIRST breadth or depth.  Think of these as controls over a funnel - very wide and shallow or very narrow and deep)
-r LOVES:both,HAS_.*:incoming= the r flag sets the relationship type.  In this case apparently (me) - [:LOVES] -> (11) or I love node 11.  To be honest, I might delete it right after this tutorial as I am already growing tired of this  relationship ;-)   I am somewhat not clear on the ":both,HAS_.*:incoming" however I believe it specifies that the traversal is to disregard the fact it is incoming or outgoing.

Okay - enough for today boys and girls.   More soon.  In the meantime, please do try this at home!


Wednesday, April 25, 2012

Getting started with Neo4J - a Beginners Tutorial

I've worked with databases for a long time.  Recently, a came across neo4J and cannot believe how awesome it is.  I want to devote this blog post to helping people get it installed and the fun you can have.

First, a little bit abut Graph Databases.  Graph databases are substantially different than RDBMS systems. As one person puts it, if you write, you can write code, if you can draw you can draw graphs.  It is really that simple.  A graph database starts with a root node.  The database is comprised of nodes, relationships, indexes and properties.  A simplification of this is the following chart:


A simple graph database.

A graph database keeps track of nodes and relationships as well as indexes (we'll get into that later).  For now think of this in kinderSpiele terms.  A graph is simply a drawing that show how things are connected.  Each connection might have a name.  each node might also have a name.  Here is a simplistic view of a graph.


In this simple graph, Duane - [LOVES] -> Neo4j, the latter of this has a property of being binary.  Now psychology aside (this in fact would be an unhealthy physical relationship), this captures several important concepts yet leaves out several very relevant ontological answers. Relationships organize Nodes into structures that allow a Graph to resemble many natural structures including a List, a Tree, a Map, or a compound Entity – any of which can be combined into yet more complex, richly inter-connected structures.  It is obvious that Duane loves Neo4J but here are some questions that are left unanswered.

1. Does neo4J love Duane back?
2. Is Neo4J even aware that Duane loves it?
3. Is Duane able to see that Neo4J is in fact a binary node and probably not suited for a proper relationship?

All are possible but undefined in this scenario.    That is why the next concept that must be introduced is a traversal mechanism.  Traversals allow navigation of graphs via statements that can select exact routing between many of these objects.  THese can be written in many languages such as cypher and allow a filter to be applied to find a path though the nodes and relationships to find answers to certain questions.  Such a question in the real world may be "How many friends do I have who enjoy eating spumonte ice crean while reading up on graph databases on Technoracle".  In reality that subset of the population is likely very small but when applied to something like Facebook or Google Plus, become highly relevant.

Here is a depiction of how traversals work. Again this is rudimentary.


Again,. this is very simple but you get the idea.  The traversal mechanism can take a set of instructions, then use if to find data it requires very efficiently.  An example might be that you use Facebook.  When you log in, it starts with the node of "you".  As the page loads, the javaScript on the page creates a backend query that says find all the nodes that are related to the user down to a layer of X deep.  Neo4J's Java API supports depth limits making it idea for this sort of operation.  Unlike an RDBSM system where an entire table might have to be walked, Neo4J allows you to set limits and take actions based on the current state.   Paths are predefined statements, often written in Cypher.

Keeping with the Facebook example, an INDEX is often a useful tool.  When a certain node is required a a start point over and over again, you can use it as an index to start with.  By contract, RDBS systems use a table and rows lookup to find the startpoint.  The index is simply a contextual based starting point.  Indexes can map directly to a node, a relationship or backwards from a property.  Instead of saying:
SELECT * FROM TABLES WHERE * EQUALS "Duane Nickull"....  you can tell a graphDB to "get Duane Nickull" then traverse outwards from him.  Simple and efficient.

Neo4J is a commercially supported, free and open source graph database that is going to rock the world.  Trust me on this.  Next post will be getting started.  All the sordid details (at least 3 easy steps) it takes to get up and running.