In one standard 8 hour day, from start to finish, I wrote a SlashDot RSS reader that works on multiple platforms. This is an attempt to share how easy it is to make a cross platform mobile application. Using Flash Builder 4.5.1, you can build this entire application for almost any RSS feed in a few hours and it will run on iOS, BlackBerry Playbook and Android powered devices.
License: You may reproduce, modify, and use these materials for just about any purpose as long as you respect the copyrights of the owners involved (including Slashdot and Adobe). You may use this to teach courses in mobile development.
In order to complete this tutorial, you will need Flash Builder 4.5 or later.
Setting up the project and the service calls
In this section, you will learn about the various components that comprise a Flex/AIR Mobile application as well as how to:
• Set up a new mobile project
• Test the project in various views
• Set up a service call
• Set up a remote data connection, parse RSS (XML format), and bind it to a visual component
• Configure the service call return type
Flash Builder 4.5 is an efficient IDE for developing mobile Flex applications. As opposed to coding native mobile applications for each platform, the portable coding approach allows developers to keep one code base and target multiple mobile and desktop platforms. The applications themselves are AIR applications compiled to look like native applications. This tutorial will show you how to target the Google Android platform but using the new builder, you can target iOS and BlackBerry too.
The following steps should take about 8-10 minutes to complete.
1. With a browser, navigate to http://rss.slashdot.org/Slashdot/slashdot. View the source of the RSS feed to inspect the complex raw source of the RSS format. View the source to see the XML structure.
2. Copy the URL from the browser window.
3. In Flash Builder, choose File > New > Flex Mobile Project and type SlashdotRSS for the name.
![]()
Figure 1. Flex Mobile New Project Wizard.
4. Click Next and the mobile project wizard will provide a multitude of choices for your project as shown in Figure 2.

Figure 2. Configuring the new Flex Mobile Project.
5. Under Target Platforms, by default you will have iOS, BlackBerry Playbook and Android selected. Note that within each of these platforms, you also have multiple devices supported. For example, if you select iOS, it supports the iPhone 3G, 4 and tablet.

Keep the application a View Based Application and leave Automatically Reorient selected.
6. Click on the Permissions tab to bring up the permissions screen.
![]()
Figure 3. Flex Mobile applications must request permissions they require.
7. To build an RSS reader you must ensure that the Internet permission is selected for each platform you target. Ensure the Platform selector is set to Android and that the Internet access permission is requested. Click Finish.
8. Flash Builder will create a new project. The SlashdotRSS project has a different structure than Flex 4 and earlier versions and is worth exploring. The SlashdotRSS.mxml file under the default package is the main entry point into the application. The views package contains the first default view, which is shown as SlashdotRSSHomeView.mxml below. The application descriptor file contains metadata about the project.
![]()
Figure 4. Flex Mobile application structure
9. To begin setting up the data service, ensure you are working on the SlashdotRSSHomeView.MXML file and choose Data > Connect to XML.
10. In the Connect To Data/Service dialog box, ensure URL is selected as the XML Source, and then paste the Slashdot URL (http://rss.slashdot.org/Slashdot/slashdot) in the URL text box. Click Invoke.
![]()
Figure 5. The Connect to Data/Service dialog box.
11. After Flash Builder introspects the service, select item as the Node. You may have to scroll down quite a ways to find it. You should see that Is Array? is checked and the default service and package names have been provided as shown in Figure 5.
12. Click Finish.
13. After Flash Builder creates the service, open the Data/Services view (Window > Show View > Data/Services) and locate the newly created service getData() function. Right-click it and select Configure Return Type (see Figure 6).
![]()
Figure 6. Selecting Configure Return Type for getData().
14. In the Configure Return Type dialog box, ensure Auto–detect The Return Type From Sample Data is selected and click Next.
15. On the next screen, select Enter A Complete URL Including Parameters And Get It. Paste the Slashdot URL in the URL To Get box (see Figure 7) and click Next.
![]()
Figure 7. Specifying the URL to use in configuring the return type.
16. On the next screen, type Item as the name of the new data type and select item as the Root node (see Figure 8). Note: If you are using another RSS feed, you will need to figure out which property is the root node.
![]()
Figure 8. Selecting the root node.
17. Click Finish.
18. Back in the Data/Services tab, right-click getData() again, and this time click Generate Service Call.
19. In Source View, add a List component and with the following properties: top=”0”, left=”0”,right=”0”,bottom=”0”.
20. Alternatively, you can add the List component in Design View. Then, select it and scroll to the bottom of the Properties tab until you see the Constraints controls. Set them as shown in Figure 9.
![]()
Figure 9. Binding the List control to the four corners.
Constraining the List control in this way ensures that the application has a consistent appearance when switching between landscape and portrait orientations.
21. Inside the <list>
![]()
![]()
Figure 10. Launching the application (top) and the application running in the emulator (bottom).
In Figure 10, notice the entity reference (—) that appears in the third element in the list. To get rid of this you’ll have to write some code to handle entity references, which is explained in the next section.
Working with List data
In this section, you will learn how to:
• Set up an event handler for a CollectionChange event and pass the event in
• Use labelFunction to call a special function that accepts a custom data type (Item[]) and returns a String.
• Set up a regular expression variable
• Use the String replace() method to replace an entity reference with another character
This section should take about 10 minutes to complete.
1. If it’s not already open, open the SlashdotRSSHomeView.mxml file.
2. In Source View, set the List control’s id to myList.
3. Position the cursor within theelement. Add an event handler for the collectionChange event that invokes a function named fixEntityReferences() when the list values change.
4. Next, add the following code to the <fx:Script> tag to implement the event handler:
import mx.events.CollectionEvent;
import valueObjects.Item;
protected function fixEntityReferences(event:CollectionEvent):void
{
myList.labelFunction = replaceEntity;
function replaceEntity(item:Item):String
{
var p1:RegExp = /(—)/ig; // perhaps add more here later
var thisString:String = item.title.replace(p1, "-");
return thisString;
}
}
The event handler function accepts the event of type CollectionEvent. It adds a labelFunction to the list. Named replaceEntity(), this function accepts an object of type Item. (Item[] is the array that is returned from the getData() service.)
The replaceEntity() function sets up a regular expression variable (p1) that detects the entity reference —. After creating a String variable named thisString, it calls the replace() method on the item.title, substituting a dash (-) for the entity reference —. Lastly, it returns the string thisString, which will be reflected as the new item label.
5. Run the program and you will see that any — entity references no longer exist (see Figure 11).
![]()
Figure 11. The application before the entity reference fix (left) and after (right).
Note: The technique used in this section to remedy the entity reference problem is a quick hack, not a best practice. The best practice would be to handle this in the value objects.
Adding the Details view
In this section you will learn how to work with views and the ViewNavigator component, which manages the views in your application as the user navigates through it. Specifically, you will create a new view that shows the details for a single RSS item. This section should take around 20 minutes to complete.
1. To add a new view, right-click the Views package in the Package Explorer and select New > MXML Component. Type DetailsView as the Name, leave the other settings at their default values, and click Finish.
2. Back in SlashdotRSSHome.mxml, position the cursor just inside the end of the <s:List> element in Source View and start typing "change". When Content Assist highlights the change event, select it and then select Generate Change Handler (see Figure 12). This will set up your event handler.
![]()
Figure 12. Generating a change handler for the list.
The newly created change handler function will push a new view that shows a detailed view of the specific item that the user clicked in the list. In Flex mobile projects, views can be pushed and then popped (see Figure 13).
![]()
Figure 13. Pushing and popping a view.
3. Update the list change event handler code as shown below.
protected function myList_changeHandler(event:IndexChangeEvent):void
{
var RSSItem:Object = myList.dataProvider.getItemAt(event.newIndex);
navigator.pushView(DetailsView, RSSItem);
}
The pushView() method takes two parameters: the view you want to push and a data object to pass to the view. In this case, the RSSItem variable is the data that will be passed to the DetailsView view.
4. Run the application. When you click on an RSS item, the new (and currently empty) details view will be displayed.
Configuring the Details view
In this section you will learn how to access the data object passed when the Details view is pushed by the Home view and display various attributes of the RSS item.
This section should take about 20 minutes to complete.
1. Open the DetailsView.mxml file in Source View.
2. Create an <fx:Script> block and add variables for the title, date, creator, link, and description of the selected RSS item.
<fx:Script>
<![CDATA[
[Bindable] private var rtitle:String;
[Bindable] private var rdate:String;
[Bindable] private var rcreator:String;
[Bindable] private var rlink:String;
[Bindable] private var rdesc:String;
]]>
</fx:Script>
3. Switch to Design View, and ensure the details view colors are the same as the home view colors. Use #336666 as the Content Background color and #666666 as the Chrome color to match the Slashdot.org colors.
4. Back in Source View, set up the Details view by adding the following MXML to the content area of the view (below the </fx:Declarations> tag).
<s:BorderContainer top="0" bottom="0" left="0" right="0"
backgroundColor="#336666">
<s:Label left="10" top="20" width="70" fontSize="18" text="Title:"
textAlign="right"/>
<s:Label left="90" right="20" top="15" height="45"
backgroundColor="#FFFFFF" color="#666666" fontSize="18"
paddingBottom="5" paddingLeft="5" paddingRight="5"
paddingTop="5" text="{rtitle}"/>
<s:Label left="10" top="75" width="70" fontSize="18" text="Date:"
textAlign="right"/>
<s:Label left="90" right="20" top="70" height="40"
backgroundColor="#FEFDFD" color="#666666" fontSize="18"
paddingBottom="5" paddingLeft="5" paddingRight="5"
paddingTop="5" text="{rdate}"/>
<s:Label left="10" top="125" width="70" fontSize="18" text="Creator:"
textAlign="right"/>
<s:Label left="90" right="20" top="120" height="40"
backgroundColor="#FFFFFF" color="#666666" fontSize="18"
paddingBottom="5" paddingLeft="5" paddingRight="5"
paddingTop="5" text="{rcreator}"/>
<s:Label left="10" top="175" width="70" fontSize="18" text="Link:"
textAlign="right"/>
<s:Label left="90" right="20" top="170" height="45"
backgroundColor="#FFFFFF" color="#1C05FB" fontSize="18"
paddingBottom="5" paddingLeft="5" paddingRight="5"
paddingTop="5" text="{rlink}" textDecoration="underline"
click="navigateToURL(new URLRequest(rlink))"/>
<s:Label left="10" top="230" width="70" fontSize="18" text="Item:"
textAlign="right"/>
<s:Label left="90" right="20" top="225" bottom="304" color="#666666"
backgroundColor="#FFFFFF" fontSize="18" paddingBottom="5"
paddingLeft="5" paddingRight="5" paddingTop="5"
text="{rdesc}" maxDisplayedLines="10" />
<s:Button left="50" right="50" bottom="101" label="Go see on Slashdot"
click="navigateToURL(new URLRequest(rlink))"/>
<s:Label left="15" right="15" bottom="23" fontSize="11"
text="All trademarks and copyrights on this page are owned by their respective owners. Comments are owned by the Poster. The Rest © 1997-2010 Geeknet, Inc."
textAlign="center" verticalAlign="middle"/>
</s:BorderContainer>
In addition to several Label elements that display the RSS item details, this view includes a button that loads the full RSS item URL in a browser when clicked. This is done using click="navigateToURL(new URLRequest(rlink))".
5. Switch to Design View. In portrait mode, the components fit nicely in the view (see Figure 14). Change to landscape mode. The components adjust to a new layout.
![]()
Figure 14. The details view in portrait mode.
Since raw RSS feeds often have HTML markup and entity references, the application will have to replace some characters in the RSS feed data. Architecturally, it would be better to handle these substitutions in the value objects package. However, for this application it will be done in the view, even though it is not a best practice.
6. Create a new function in the DetailsView called getDetails() and add the following code.
import valueObjects.Item;
private function getDetails():void
{
var p:RegExp = /(—)/ig;
var h:RegExp = /<p(>|(\s*[^>]*>)).*?<\/p>/ig;
var thisItem:Item = data as Item;
rtitle = thisItem.title;
rtitle = rtitle.replace(p, "-");
rdate = thisItem.dc_date;
rcreator = thisItem.dc_creator
rlink = thisItem.link;
rdesc = thisItem.description;
rdesc = rdesc.replace(h, "");
rdesc = rdesc.replace(p, "-");
}
The keyword data is a variable reference to the data passed to this view.
The title, dc_date, dc_creator, link, and description attributes of the RSS Item object are used to set the variables. The calls to replace() use the regular expressions to replace entity references in the title and the description, as well as to eliminate HTML markup in the description.
7. Add viewActivate="getDetails()" to the root <s:View> element. This will invoke getDetails() when the view is activated. While you’re there, insert a space between "Details" and "View" in the title attribute.
8. Run your application. Click on an item to see the Details view (see Figure 15). Click the button to launch the Slashdot story in a browser.
![]()
Figure 15. The completed details view.
Fixing an architectural mistake
In this section you will learn a best practice for mobile development. This section should take around 10 minutes to complete.
Although you may not have noticed it as you used the application in the emulator, each time the home view is shown, a new call is made to the RSS service. This consumes CPU cycles (and battery charge) and also incurs unnecessary data bandwidth charges for the user. Needless to say, this is not the best way for the application to behave.
To get a better understanding of this architectural mistake, it helps to enable the network monitor.
1. In Flash Builder, choose Window > Show View > Other and then select Flash Builder > Network Monitor to open the Network Monitor view.
2. Enable the Network Monitor by clicking the Enable Monitor button (see Figure 16). (It is disabled by default.)
![]()
Figure 16. Enabling the Network Monitor.
3. Run your application again in the emulator and watch the network calls as you navigate between the Home view and the Details view. (To return to the Home view from the Details view in the emulator, choose Device > Back or press Control+B.)
As you can see, there is a service call each time the Home view is displayed. Luckily, this is easy to fix.
1. Open the SlashdotRSSHomeView.mxml file.
2. In the root element, remove the call to getData() on the viewActivate event (see Figure 17). Set the destructionPolicy attribute to "never". While you’re there, set the title attribute to "Slashdot RSS".
![]()
Figure 17. Remove the getData() function call on the viewActivate event.
The destruction policy defines the policy that the view's navigator will use when this view is removed. If set to "auto", the ViewNavigator component will destroy the view when it isn't active. If set to "never", the view will be cached in memory. For items such as an RSS feed that do not update very often, it is best to allow the user to manually refresh the list or to update the list periodically.
You still need to call getData() at the launch of the application. This can be done from the main application file.
3. Open SlashdotRSS.mxml, the file for the main entry point into the application. This is located in the project’s default package. In the Package Explorer it has a blue dot and green triangle beside it (see Figure 18).
![]()
Figure 18. Locating the main application file.
4. Add applicationComplete="getRSS()" to the root element of the application (<MobileApplication>). After the application has been initialized, the applicationComplete event is dispatched and getRSS() will be invoked.
<?xml version="1.0" encoding="utf-8"?>
<s:ViewNavigatorApplication xmlns:fx="http://ns.adobe.com/mxml/2009"
xmlns:s="library://ns.adobe.com/flex/spark"
firstView="views.SlashdotRSSHomeView"
applicationComplete="getRSS()">
5. Now create the function that will make the initial service call to get the RSS items. After deleting the empty <fx:Declarations> element, add the following code:
<fx:Script>
<![CDATA[
private function getRSS():void
{
Object(navigator.activeView).getData();
}
]]> </fx:Script>
The code Object(navigator.activeView).getData(); can reference the getData() function directly if it has been made public. If you generated the function, it will be protected by default and that will have to be changed. Since this only gets called once, we do not have to test to see which view is active.
6. Back in the SlashdotRSSHomeView.mxmlfile, change the access modifier for the getData() function from protected to public as shown below.
//service call
public function getData():void
{
getDataResult.token = slashdot.getData(); } 7. Run your application. Verify that getData() is getting called when the application launches.
Adding a manual refresh capability
Now that you have removed the service call that was invoked each time the Home view was shown, it’s a good idea to give the user a way to refresh the list of RSS items manually. In this section you will learn about:
• Action content
• Making calls from the application to functions contained in views
• How to embed icons within buttons
There are basically four main areas for a Flex mobile application built for the Android OS: navigation content, title content, action content, and the view (see Figure 19). Action content is usually on the right-hand side, and that is where you’ll position the icon that will be used to refresh the list.
![]()
Figure 19. The main areas of a mobile Flex application.
1. To create a refresh icon, you will need an icon approximately 48 x 48 pixels with a transparent background in PNG format. Locate the refresh48x48.png and info48x48.png files in the icons package of the starter project for this tutorial.
2. Right-click the src folder of your application and select New > Package. Type icons as the package name and click Finish. This will set up a folder for your icon images.
3. Copy the refresh48x48.png and info48x48.png icon files into the new package.
4. Open SlashdotRSSHomeView.mxml and insert the following code, which adds an action content area to the Home view (the File should be named “SlashdotRSS.mxml”) with a button that embeds the refresh icon image.
<s:actionContent>
<s:Button icon="@Embed(source='icons/refresh48x48.png')" />
</s:actionContent>
5. Run the application to verify that the button is displayed (see Figure 20).
![]()
Figure 20. The new refresh button.
6. Switch back to Source View and add the following function:
private function refreshList():void
{
if (navigator.activeView.name.slice(0,19) == "SlashdotRSSHomeView")
{
Object(navigator.activeView).getData();
}
}
7. Within the button declaration, add click="refreshList()" to capture the click event and make a call to the newly created refreshList() function.
<s:actionContent>
<s:Button icon="@Embed(source='icons/refresh48x48.png')"
click="refreshList()"/>
</s:actionContent>
8. With the Network Monitor on, run the application. Each time you click the refresh button it should invoke another service call. Ensure that this only happens while in the view where the list is.
The application no longer automatically refreshes. Instead, the addition of a user controlled Refresh button places the power into your users’ hands, which is a best practice. They know their data plan and battery life, and it is a good idea to enable them to control this functionality.
Adding the Info view
This section will take about eight minutes to complete.
1. If you have not already done so, copy info48x48.PNG from the starter project to the icons package of your project.
2. Since this icon should be visible from all views in the application, it can be added to the entry point into the application, in this case the SlashdotRSS.mxml file. Add the following code to set up the button and a click event handler named showInfoView() (yet to be written).
<s:actionContent>
<s:Button icon="@Embed(source='icons/info48x48.png')"
click="showInfoView()" />
</s:actionContent>
3. To create the new view, right-click the views package in the Package Explorer and select New > MXML Component.
4. In the New MXML Component dialog box, type views as the Package and InfoView as the Name. Make sure that the new component is based on spark.components.view (see Figure 21) and click Finish.
![]()
Figure 21. Adding the InfoView component.
5. Open InfoView.mxml in Source View and change the title attribute in the <s:View> element to "About RSS Reader". Then add the following code.
<s:Label left="0" right="0" top="0" bottom="0" textAlign="center"
paddingBottom="175" paddingLeft="40" paddingRight="40"
paddingTop="30" backgroundColor="#336666"
text="This application was built to demonstrate how easy it is to create mobile applications using Adobe Flash Builder and Adobe AIR. Slashdot was chosen as a site because it has complex RSS formats and offers an open feed for all to consume. Please consider supporting Slashdot!
The source code for this application is freely available and can be found at http://technoracle.blogspot.com/2010/12/mobile-slashdot-rss-reader-tutorial.html."/>
<s:Button left="50" right="50" bottom="140" label="Get Source Code" click="navigateToURL(new URLRequest('http://technoracle.blogspot.com/2010/12/mobile-slashdot-rss-reader-tutorial.html'));"/>
<s:Label left="15" right="15" bottom="23" fontSize="11"
text="All trademarks and copyrights on this page are owned by their respective owners. Comments are owned by the Poster. The Rest © 1997-2010 Geeknet, Inc."
textAlign="center" verticalAlign="middle"/>
Note: The text and navigateToURL link can be changed for each project.
6. Open the Home view file (SlashdotRSSHomeView.mxml) and add a function named showInfo() in the <fx:Script> block. This function will be used to push the InfoView.
public function showInfo():void
{
navigator.pushView(InfoView); }
7. Repeat the previous step for DetailsView.mxml.
8. Open the SlashdotRSS.mxml file (the entry point into the application) and add a showInfoView() function, which calls the showInfo() function from the active view.
private function showInfoView():void
{
Object(navigator.activeView).showInfo();
} If you run your application now, you’ll notice the Info button in the InfoView, where it is not needed.
9. To remove the Info button from the Info view, open InfoView.mxml and add an empty <s:actionContent> element.
<s:actionContent/>
10. You'll also notice that the Info button does not appear on the list view where it belongs. This is because the actionContent element in view overrides the one in the main application file. Open SlashdotRSSHomeView.mxml and add the following to the actionContent element:
Adding a splash screen
You’re almost done building this Flex mobile application. One final thought is that on some devices it might take the application a while to load. A splash screen will let the user know something is happening as the application starts up.
In this section you will learn:
• What a splash screen does and why it is a good idea
• How to add a splash screen
Mobile applications must always strive for efficient use of the CPU and battery. When an application takes time to load, it can give the user the impression that the entire application is sluggish. One way to show the user that the application is reacting quickly to user actions is via the view (in this context, view refers to the MVC pattern concept of view). Adding a splash screen is fortunately quite easy. The splash screen is shown while the main parts of the application load and disappears as the main application has finished initializing.
This section will take less than five minutes to complete.
1. Create a new package under the src folder of your project and name it splash.
![]()
Figure 22. The slashscreen.png file in the splash package.
2. Copy the splashscreen.png file from the starter project into the splash package (see Figure 22).
![]()
Figure 23. The splash screen image for RSS Reader is 400 x 400 pixels square.
Keep in mind that a user might open your application in landscape mode. To account for this, you can either restrict the application to open only in portrait mode, or set the width and height of your splash screen image so it will not matter; for example, use 400 x 400 pixels (see Figure 23).
3. Open SlashdotRSS.mxml and add splashScreenImage="@Embed('splash/splashscreen.png')" to the root <s:ViewNavigatorApplication> element of the application, as shown below.
<s:ViewNavigatorApplication xmlns:fx="http://ns.adobe.com/mxml/2009"
xmlns:s="library://ns.adobe.com/flex/spark"
firstView="views.SlashdotRSSHomeView"
applicationComplete="getRSS()"
splashScreenImage="@Embed('splash/splashscreen.png')">4. Run your application. The splash screen image will appear momentarily while the application is loading.
Packaging your application for the Android Market
Now that you have a fully functioning application, there are a few remaining tasks to complete before you can publish your application to the Android Market. If this is your first time publishing an application, visit http://market.android.com/publish/signup to set up an account.
After you register, you will find list of requirements for publishing your application. Complying with these requirements will help your application look more professional and will also allow people to find it easier. Among the most important requirements are the icons, which are required in multiple sizes from 512 x 512 pixels to 16 x 16 pixels. It is best to develop the largest size first, and then scale down the rest.
Once you have developed a base icon, save it in the following sizes under the /src/icons/ folder in your project:
• icon32x32.png
• icon36x36.png
• icon48x48.png
• icon72x72.png
• icon128x128.png
Ensure you keep the 512 x 512 pixel PNG original as you will need it for the Android Market. Example versions of these icons can be found in the starter project.
Additionally, you will need a PKCS12 digital certificate that is valid until after October 22, 2033. This may surprise you, but it’s not hard to create one. For details on creating your own digital certificate, see Generating a PKCS12 certificate for Android Market.
Follow these steps to place your application in the Android Market.
1. Locate the application descriptor file, which you will find in the project’s src folder (see Figure 24). For this project, it is named SlashdotRSS-app.xml. This XML file specifies parameters for identifying, installing, and launching AIR applications. You will need to make a few modifications to this file.
![]() Figure 24. The application descriptor file.
Figure 24. The application descriptor file.
2. Do not open the file by double-clicking, that would open it with the XML editor. Instead, right-click the file and select Open With > Text Editor.
3. Provide a valid name and version for your application. The name can be changed by editing the <name> element near line 25.
4. Type some descriptive text that identifies your application. For example, you might type Slashdot RSS Monitor or something similar (see Figure 25). Note: The exact line number and comment text may differ from those shown.
![]()
Figure 25. Changing the <name> element.
5. Next set the version number for your application. If you decide you are a great coder and there is no chance of any bugs, you might choose version 1.0. Set this value in the <versionNumber> element near line 30 (see Figure 26).
![]() Figure 26. Changing the <versionNumber> element.
Figure 26. Changing the <versionNumber> element.
6. Next, you’ll want to define where the main application can locate the proper PNG application icons. Near line 109, find the <image16x16> element, which begins a set of six similar elements (see Figure 27).
![]()
Figure 27. The icon elements before editing.
7. Insert the name of the appropriate icon file in each element (see Figure 28).
![]()
Figure 28. The icon elements after editing.
There are many other items that may be set in the application descriptor file including descriptions, copyright, and more. For more information, refer to the Adobe AIR documentation.
8. Save your changes.
9. If you have not already done so, copy the necessary icon PNG files from the starter project into your project’s src/icons folder.
10. Right-click the project in the Package Explorer and select Export.
11. In the Export dialog box, select Flash Builder > Release Build (see Figure 29).
![]()
Figure 29. Exporting the release build.
12. Click Next.
13. On the next screen, ensure you’re exporting the correct project and leave the other options at their default values (see Figure 30). Click Next.
![]()
Figure 30. Specifying the export folder.
14. On the next screen, specify the location of your digital certificate and type the password. Make sure that the certificate you created complies with the requirements of the Android Market. Again, for instructions on creating such a certificate, see Generating a PKCS12 certificate for Android Market.
15. Click Finish.
That’s it! When you see the success confirmation (see Figure 31) you will have a new *.apk file (which is the native installer package for Google Android devices).
![]()
Figure 31. Confirmation of a successful release build export.
Where to go from here
Congratulations! You are now a mobile developer!
I encourage you to try your hand at developing your own mobile applications using Flash Builder and the techniques you’ve learned in the article.
For more information on Flex mobile development see the following resources:
• Flex Test Drive for Mobile: Build a mobile application in an hour
• Mobile Application Development with Flex
• Video of this tutorial: Part 1 Part 2
License: You may reproduce, modify, and use these materials for just about any purpose as long as you respect the copyrights of the owners involved (including Slashdot and Adobe). You may use this to teach courses in mobile development.
In order to complete this tutorial, you will need Flash Builder 4.5 or later.
Setting up the project and the service calls
In this section, you will learn about the various components that comprise a Flex/AIR Mobile application as well as how to:
• Set up a new mobile project
• Test the project in various views
• Set up a service call
• Set up a remote data connection, parse RSS (XML format), and bind it to a visual component
• Configure the service call return type
Flash Builder 4.5 is an efficient IDE for developing mobile Flex applications. As opposed to coding native mobile applications for each platform, the portable coding approach allows developers to keep one code base and target multiple mobile and desktop platforms. The applications themselves are AIR applications compiled to look like native applications. This tutorial will show you how to target the Google Android platform but using the new builder, you can target iOS and BlackBerry too.
The following steps should take about 8-10 minutes to complete.
1. With a browser, navigate to http://rss.slashdot.org/Slashdot/slashdot. View the source of the RSS feed to inspect the complex raw source of the RSS format. View the source to see the XML structure.
2. Copy the URL from the browser window.
3. In Flash Builder, choose File > New > Flex Mobile Project and type SlashdotRSS for the name.

Figure 1. Flex Mobile New Project Wizard.
4. Click Next and the mobile project wizard will provide a multitude of choices for your project as shown in Figure 2.

Figure 2. Configuring the new Flex Mobile Project.
5. Under Target Platforms, by default you will have iOS, BlackBerry Playbook and Android selected. Note that within each of these platforms, you also have multiple devices supported. For example, if you select iOS, it supports the iPhone 3G, 4 and tablet.

Keep the application a View Based Application and leave Automatically Reorient selected.
6. Click on the Permissions tab to bring up the permissions screen.

Figure 3. Flex Mobile applications must request permissions they require.
7. To build an RSS reader you must ensure that the Internet permission is selected for each platform you target. Ensure the Platform selector is set to Android and that the Internet access permission is requested. Click Finish.
8. Flash Builder will create a new project. The SlashdotRSS project has a different structure than Flex 4 and earlier versions and is worth exploring. The SlashdotRSS.mxml file under the default package is the main entry point into the application. The views package contains the first default view, which is shown as SlashdotRSSHomeView.mxml below. The application descriptor file contains metadata about the project.
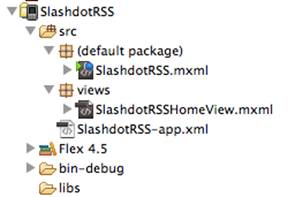
Figure 4. Flex Mobile application structure
9. To begin setting up the data service, ensure you are working on the SlashdotRSSHomeView.MXML file and choose Data > Connect to XML.
10. In the Connect To Data/Service dialog box, ensure URL is selected as the XML Source, and then paste the Slashdot URL (http://rss.slashdot.org/Slashdot/slashdot) in the URL text box. Click Invoke.

Figure 5. The Connect to Data/Service dialog box.
11. After Flash Builder introspects the service, select item as the Node. You may have to scroll down quite a ways to find it. You should see that Is Array? is checked and the default service and package names have been provided as shown in Figure 5.
12. Click Finish.
13. After Flash Builder creates the service, open the Data/Services view (Window > Show View > Data/Services) and locate the newly created service getData() function. Right-click it and select Configure Return Type (see Figure 6).

Figure 6. Selecting Configure Return Type for getData().
14. In the Configure Return Type dialog box, ensure Auto–detect The Return Type From Sample Data is selected and click Next.
15. On the next screen, select Enter A Complete URL Including Parameters And Get It. Paste the Slashdot URL in the URL To Get box (see Figure 7) and click Next.

Figure 7. Specifying the URL to use in configuring the return type.
16. On the next screen, type Item as the name of the new data type and select item as the Root node (see Figure 8). Note: If you are using another RSS feed, you will need to figure out which property is the root node.

Figure 8. Selecting the root node.
17. Click Finish.
18. Back in the Data/Services tab, right-click getData() again, and this time click Generate Service Call.
19. In Source View, add a List component and with the following properties: top=”0”, left=”0”,right=”0”,bottom=”0”.
20. Alternatively, you can add the List component in Design View. Then, select it and scroll to the bottom of the Properties tab until you see the Constraints controls. Set them as shown in Figure 9.

Figure 9. Binding the List control to the four corners.
Constraining the List control in this way ensures that the application has a consistent appearance when switching between landscape and portrait orientations.
21. Inside the <list>
- element set the labelField value to "title". Then add <s:AsynchListView list="{getDataResult.lastResult}" />
<s:List left="0" right="0" top="0" bottom="0" labelField="title">
<s:AsyncListView list="{getDataResult.lastResult}" />
</s:List>
22. Add a call to getData() on the viewActivate event in the root element.
23. In Design View, change the Chrome (#666666) and Content Background (#336666) colors to match the Slashdot home page. These settings are found on the Appearance tab.
24. Test your application by running it! Right-click the project in the Package Explorer and select Run > Run As > Mobile Application. When you first run it, you will be asked if you want to launch it in an emulator ("On Desktop") or on a remote device. Use the emulator for now. If you get asked if you want to auto-deploy the model to the server, select No and click OK.


Figure 10. Launching the application (top) and the application running in the emulator (bottom).
In Figure 10, notice the entity reference (—) that appears in the third element in the list. To get rid of this you’ll have to write some code to handle entity references, which is explained in the next section.
Working with List data
In this section, you will learn how to:
• Set up an event handler for a CollectionChange event and pass the event in
• Use labelFunction to call a special function that accepts a custom data type (Item[]) and returns a String.
• Set up a regular expression variable
• Use the String replace() method to replace an entity reference with another character
This section should take about 10 minutes to complete.
1. If it’s not already open, open the SlashdotRSSHomeView.mxml file.
2. In Source View, set the List control’s id to myList.
3. Position the cursor within the
4. Next, add the following code to the <fx:Script> tag to implement the event handler:
import mx.events.CollectionEvent;
import valueObjects.Item;
protected function fixEntityReferences(event:CollectionEvent):void
{
myList.labelFunction = replaceEntity;
function replaceEntity(item:Item):String
{
var p1:RegExp = /(—)/ig; // perhaps add more here later
var thisString:String = item.title.replace(p1, "-");
return thisString;
}
}
The event handler function accepts the event of type CollectionEvent. It adds a labelFunction to the list. Named replaceEntity(), this function accepts an object of type Item. (Item[] is the array that is returned from the getData() service.)
The replaceEntity() function sets up a regular expression variable (p1) that detects the entity reference —. After creating a String variable named thisString, it calls the replace() method on the item.title, substituting a dash (-) for the entity reference —. Lastly, it returns the string thisString, which will be reflected as the new item label.
5. Run the program and you will see that any — entity references no longer exist (see Figure 11).

Figure 11. The application before the entity reference fix (left) and after (right).
Note: The technique used in this section to remedy the entity reference problem is a quick hack, not a best practice. The best practice would be to handle this in the value objects.
Adding the Details view
In this section you will learn how to work with views and the ViewNavigator component, which manages the views in your application as the user navigates through it. Specifically, you will create a new view that shows the details for a single RSS item. This section should take around 20 minutes to complete.
1. To add a new view, right-click the Views package in the Package Explorer and select New > MXML Component. Type DetailsView as the Name, leave the other settings at their default values, and click Finish.
2. Back in SlashdotRSSHome.mxml, position the cursor just inside the end of the <s:List> element in Source View and start typing "change". When Content Assist highlights the change event, select it and then select Generate Change Handler (see Figure 12). This will set up your event handler.

Figure 12. Generating a change handler for the list.
The newly created change handler function will push a new view that shows a detailed view of the specific item that the user clicked in the list. In Flex mobile projects, views can be pushed and then popped (see Figure 13).

Figure 13. Pushing and popping a view.
3. Update the list change event handler code as shown below.
protected function myList_changeHandler(event:IndexChangeEvent):void
{
var RSSItem:Object = myList.dataProvider.getItemAt(event.newIndex);
navigator.pushView(DetailsView, RSSItem);
}
The pushView() method takes two parameters: the view you want to push and a data object to pass to the view. In this case, the RSSItem variable is the data that will be passed to the DetailsView view.
4. Run the application. When you click on an RSS item, the new (and currently empty) details view will be displayed.
Configuring the Details view
In this section you will learn how to access the data object passed when the Details view is pushed by the Home view and display various attributes of the RSS item.
This section should take about 20 minutes to complete.
1. Open the DetailsView.mxml file in Source View.
2. Create an <fx:Script> block and add variables for the title, date, creator, link, and description of the selected RSS item.
<fx:Script>
<![CDATA[
[Bindable] private var rtitle:String;
[Bindable] private var rdate:String;
[Bindable] private var rcreator:String;
[Bindable] private var rlink:String;
[Bindable] private var rdesc:String;
]]>
</fx:Script>
3. Switch to Design View, and ensure the details view colors are the same as the home view colors. Use #336666 as the Content Background color and #666666 as the Chrome color to match the Slashdot.org colors.
4. Back in Source View, set up the Details view by adding the following MXML to the content area of the view (below the </fx:Declarations> tag).
<s:BorderContainer top="0" bottom="0" left="0" right="0"
backgroundColor="#336666">
<s:Label left="10" top="20" width="70" fontSize="18" text="Title:"
textAlign="right"/>
<s:Label left="90" right="20" top="15" height="45"
backgroundColor="#FFFFFF" color="#666666" fontSize="18"
paddingBottom="5" paddingLeft="5" paddingRight="5"
paddingTop="5" text="{rtitle}"/>
<s:Label left="10" top="75" width="70" fontSize="18" text="Date:"
textAlign="right"/>
<s:Label left="90" right="20" top="70" height="40"
backgroundColor="#FEFDFD" color="#666666" fontSize="18"
paddingBottom="5" paddingLeft="5" paddingRight="5"
paddingTop="5" text="{rdate}"/>
<s:Label left="10" top="125" width="70" fontSize="18" text="Creator:"
textAlign="right"/>
<s:Label left="90" right="20" top="120" height="40"
backgroundColor="#FFFFFF" color="#666666" fontSize="18"
paddingBottom="5" paddingLeft="5" paddingRight="5"
paddingTop="5" text="{rcreator}"/>
<s:Label left="10" top="175" width="70" fontSize="18" text="Link:"
textAlign="right"/>
<s:Label left="90" right="20" top="170" height="45"
backgroundColor="#FFFFFF" color="#1C05FB" fontSize="18"
paddingBottom="5" paddingLeft="5" paddingRight="5"
paddingTop="5" text="{rlink}" textDecoration="underline"
click="navigateToURL(new URLRequest(rlink))"/>
<s:Label left="10" top="230" width="70" fontSize="18" text="Item:"
textAlign="right"/>
<s:Label left="90" right="20" top="225" bottom="304" color="#666666"
backgroundColor="#FFFFFF" fontSize="18" paddingBottom="5"
paddingLeft="5" paddingRight="5" paddingTop="5"
text="{rdesc}" maxDisplayedLines="10" />
<s:Button left="50" right="50" bottom="101" label="Go see on Slashdot"
click="navigateToURL(new URLRequest(rlink))"/>
<s:Label left="15" right="15" bottom="23" fontSize="11"
text="All trademarks and copyrights on this page are owned by their respective owners. Comments are owned by the Poster. The Rest © 1997-2010 Geeknet, Inc."
textAlign="center" verticalAlign="middle"/>
</s:BorderContainer>
In addition to several Label elements that display the RSS item details, this view includes a button that loads the full RSS item URL in a browser when clicked. This is done using click="navigateToURL(new URLRequest(rlink))".
5. Switch to Design View. In portrait mode, the components fit nicely in the view (see Figure 14). Change to landscape mode. The components adjust to a new layout.

Figure 14. The details view in portrait mode.
Since raw RSS feeds often have HTML markup and entity references, the application will have to replace some characters in the RSS feed data. Architecturally, it would be better to handle these substitutions in the value objects package. However, for this application it will be done in the view, even though it is not a best practice.
6. Create a new function in the DetailsView called getDetails() and add the following code.
import valueObjects.Item;
private function getDetails():void
{
var p:RegExp = /(—)/ig;
var h:RegExp = /<p(>|(\s*[^>]*>)).*?<\/p>/ig;
var thisItem:Item = data as Item;
rtitle = thisItem.title;
rtitle = rtitle.replace(p, "-");
rdate = thisItem.dc_date;
rcreator = thisItem.dc_creator
rlink = thisItem.link;
rdesc = thisItem.description;
rdesc = rdesc.replace(h, "");
rdesc = rdesc.replace(p, "-");
The title, dc_date, dc_creator, link, and description attributes of the RSS Item object are used to set the variables. The calls to replace() use the regular expressions to replace entity references in the title and the description, as well as to eliminate HTML markup in the description.
7. Add viewActivate="getDetails()" to the root <s:View> element. This will invoke getDetails() when the view is activated. While you’re there, insert a space between "Details" and "View" in the title attribute.
8. Run your application. Click on an item to see the Details view (see Figure 15). Click the button to launch the Slashdot story in a browser.

Figure 15. The completed details view.
Fixing an architectural mistake
In this section you will learn a best practice for mobile development. This section should take around 10 minutes to complete.
Although you may not have noticed it as you used the application in the emulator, each time the home view is shown, a new call is made to the RSS service. This consumes CPU cycles (and battery charge) and also incurs unnecessary data bandwidth charges for the user. Needless to say, this is not the best way for the application to behave.
To get a better understanding of this architectural mistake, it helps to enable the network monitor.
1. In Flash Builder, choose Window > Show View > Other and then select Flash Builder > Network Monitor to open the Network Monitor view.
2. Enable the Network Monitor by clicking the Enable Monitor button (see Figure 16). (It is disabled by default.)

Figure 16. Enabling the Network Monitor.
3. Run your application again in the emulator and watch the network calls as you navigate between the Home view and the Details view. (To return to the Home view from the Details view in the emulator, choose Device > Back or press Control+B.)
As you can see, there is a service call each time the Home view is displayed. Luckily, this is easy to fix.
1. Open the SlashdotRSSHomeView.mxml file.
2. In the root element, remove the call to getData() on the viewActivate event (see Figure 17). Set the destructionPolicy attribute to "never". While you’re there, set the title attribute to "Slashdot RSS".

Figure 17. Remove the getData() function call on the viewActivate event.
The destruction policy defines the policy that the view's navigator will use when this view is removed. If set to "auto", the ViewNavigator component will destroy the view when it isn't active. If set to "never", the view will be cached in memory. For items such as an RSS feed that do not update very often, it is best to allow the user to manually refresh the list or to update the list periodically.
You still need to call getData() at the launch of the application. This can be done from the main application file.
3. Open SlashdotRSS.mxml, the file for the main entry point into the application. This is located in the project’s default package. In the Package Explorer it has a blue dot and green triangle beside it (see Figure 18).

Figure 18. Locating the main application file.
4. Add applicationComplete="getRSS()" to the root element of the application (<MobileApplication>). After the application has been initialized, the applicationComplete event is dispatched and getRSS() will be invoked.
<?xml version="1.0" encoding="utf-8"?>
<s:ViewNavigatorApplication xmlns:fx="http://ns.adobe.com/mxml/2009"
xmlns:s="library://ns.adobe.com/flex/spark"
firstView="views.SlashdotRSSHomeView"
applicationComplete="getRSS()">
5. Now create the function that will make the initial service call to get the RSS items. After deleting the empty <fx:Declarations> element, add the following code:
<fx:Script>
<![CDATA[
private function getRSS():void
{
Object(navigator.activeView).getData();
}
]]> </fx:Script>
The code Object(navigator.activeView).getData(); can reference the getData() function directly if it has been made public. If you generated the function, it will be protected by default and that will have to be changed. Since this only gets called once, we do not have to test to see which view is active.
6. Back in the SlashdotRSSHomeView.mxmlfile, change the access modifier for the getData() function from protected to public as shown below.
//service call
public function getData():void
{
getDataResult.token = slashdot.getData();
Now that you have removed the service call that was invoked each time the Home view was shown, it’s a good idea to give the user a way to refresh the list of RSS items manually. In this section you will learn about:
• Action content
• Making calls from the application to functions contained in views
• How to embed icons within buttons
There are basically four main areas for a Flex mobile application built for the Android OS: navigation content, title content, action content, and the view (see Figure 19). Action content is usually on the right-hand side, and that is where you’ll position the icon that will be used to refresh the list.

Figure 19. The main areas of a mobile Flex application.
1. To create a refresh icon, you will need an icon approximately 48 x 48 pixels with a transparent background in PNG format. Locate the refresh48x48.png and info48x48.png files in the icons package of the starter project for this tutorial.
2. Right-click the src folder of your application and select New > Package. Type icons as the package name and click Finish. This will set up a folder for your icon images.
3. Copy the refresh48x48.png and info48x48.png icon files into the new package.
4. Open SlashdotRSSHomeView.mxml and insert the following code, which adds an action content area to the Home view (the File should be named “SlashdotRSS.mxml”) with a button that embeds the refresh icon image.
<s:actionContent>
<s:Button icon="@Embed(source='icons/refresh48x48.png')" />
</s:actionContent>
5. Run the application to verify that the button is displayed (see Figure 20).

Figure 20. The new refresh button.
6. Switch back to Source View and add the following function:
private function refreshList():void
{
if (navigator.activeView.name.slice(0,19) == "SlashdotRSSHomeView")
{
Object(navigator.activeView).getData();
}
}
7. Within the button declaration, add click="refreshList()" to capture the click event and make a call to the newly created refreshList() function.
<s:actionContent>
<s:Button icon="@Embed(source='icons/refresh48x48.png')"
click="refreshList()"/>
</s:actionContent>
8. With the Network Monitor on, run the application. Each time you click the refresh button it should invoke another service call. Ensure that this only happens while in the view where the list is.
The application no longer automatically refreshes. Instead, the addition of a user controlled Refresh button places the power into your users’ hands, which is a best practice. They know their data plan and battery life, and it is a good idea to enable them to control this functionality.
Now that the architecture is solid, it is time to add another view to allow users to see information about the application. The Info view will be relatively simple to add, and it will give users information about getting the source code for the application (pay it forward!).
1. If you have not already done so, copy info48x48.PNG from the starter project to the icons package of your project.
2. Since this icon should be visible from all views in the application, it can be added to the entry point into the application, in this case the SlashdotRSS.mxml file. Add the following code to set up the button and a click event handler named showInfoView() (yet to be written).
<s:actionContent>
<s:Button icon="@Embed(source='icons/info48x48.png')"
click="showInfoView()" />
</s:actionContent>
3. To create the new view, right-click the views package in the Package Explorer and select New > MXML Component.
4. In the New MXML Component dialog box, type views as the Package and InfoView as the Name. Make sure that the new component is based on spark.components.view (see Figure 21) and click Finish.

Figure 21. Adding the InfoView component.
5. Open InfoView.mxml in Source View and change the title attribute in the <s:View> element to "About RSS Reader". Then add the following code.
<s:Label left="0" right="0" top="0" bottom="0" textAlign="center"
paddingBottom="175" paddingLeft="40" paddingRight="40"
paddingTop="30" backgroundColor="#336666"
text="This application was built to demonstrate how easy it is to create mobile applications using Adobe Flash Builder and Adobe AIR. Slashdot was chosen as a site because it has complex RSS formats and offers an open feed for all to consume. Please consider supporting Slashdot!
The source code for this application is freely available and can be found at http://technoracle.blogspot.com/2010/12/mobile-slashdot-rss-reader-tutorial.html."/>
<s:Button left="50" right="50" bottom="140" label="Get Source Code" click="navigateToURL(new URLRequest('http://technoracle.blogspot.com/2010/12/mobile-slashdot-rss-reader-tutorial.html'));"/>
<s:Label left="15" right="15" bottom="23" fontSize="11"
text="All trademarks and copyrights on this page are owned by their respective owners. Comments are owned by the Poster. The Rest © 1997-2010 Geeknet, Inc."
textAlign="center" verticalAlign="middle"/>
6. Open the Home view file (SlashdotRSSHomeView.mxml) and add a function named showInfo() in the <fx:Script> block. This function will be used to push the InfoView.
public function showInfo():void
{
navigator.pushView(InfoView);
8. Open the SlashdotRSS.mxml file (the entry point into the application) and add a showInfoView() function, which calls the showInfo() function from the active view.
private function showInfoView():void
{
Object(navigator.activeView).showInfo();
}
9. To remove the Info button from the Info view, open InfoView.mxml and add an empty <s:actionContent> element.
<s:actionContent/>
<s:Button icon="@Embed(source='icons/info48x48.png')"
click="showInfo()" />
Adding a splash screen
You’re almost done building this Flex mobile application. One final thought is that on some devices it might take the application a while to load. A splash screen will let the user know something is happening as the application starts up.
In this section you will learn:
• What a splash screen does and why it is a good idea
• How to add a splash screen
Mobile applications must always strive for efficient use of the CPU and battery. When an application takes time to load, it can give the user the impression that the entire application is sluggish. One way to show the user that the application is reacting quickly to user actions is via the view (in this context, view refers to the MVC pattern concept of view). Adding a splash screen is fortunately quite easy. The splash screen is shown while the main parts of the application load and disappears as the main application has finished initializing.
This section will take less than five minutes to complete.
1. Create a new package under the src folder of your project and name it splash.

Figure 22. The slashscreen.png file in the splash package.
2. Copy the splashscreen.png file from the starter project into the splash package (see Figure 22).

Figure 23. The splash screen image for RSS Reader is 400 x 400 pixels square.
Keep in mind that a user might open your application in landscape mode. To account for this, you can either restrict the application to open only in portrait mode, or set the width and height of your splash screen image so it will not matter; for example, use 400 x 400 pixels (see Figure 23).
3. Open SlashdotRSS.mxml and add splashScreenImage="@Embed('splash/splashscreen.png')" to the root <s:ViewNavigatorApplication> element of the application, as shown below.
<s:ViewNavigatorApplication xmlns:fx="http://ns.adobe.com/mxml/2009"
xmlns:s="library://ns.adobe.com/flex/spark"
firstView="views.SlashdotRSSHomeView"
applicationComplete="getRSS()"
splashScreenImage="@Embed('splash/splashscreen.png')">
Packaging your application for the Android Market
Now that you have a fully functioning application, there are a few remaining tasks to complete before you can publish your application to the Android Market. If this is your first time publishing an application, visit http://market.android.com/publish/signup to set up an account.
After you register, you will find list of requirements for publishing your application. Complying with these requirements will help your application look more professional and will also allow people to find it easier. Among the most important requirements are the icons, which are required in multiple sizes from 512 x 512 pixels to 16 x 16 pixels. It is best to develop the largest size first, and then scale down the rest.
Once you have developed a base icon, save it in the following sizes under the /src/icons/ folder in your project:
• icon32x32.png
• icon36x36.png
• icon48x48.png
• icon72x72.png
• icon128x128.png
Ensure you keep the 512 x 512 pixel PNG original as you will need it for the Android Market. Example versions of these icons can be found in the starter project.
Additionally, you will need a PKCS12 digital certificate that is valid until after October 22, 2033. This may surprise you, but it’s not hard to create one. For details on creating your own digital certificate, see Generating a PKCS12 certificate for Android Market.
Follow these steps to place your application in the Android Market.
1. Locate the application descriptor file, which you will find in the project’s src folder (see Figure 24). For this project, it is named SlashdotRSS-app.xml. This XML file specifies parameters for identifying, installing, and launching AIR applications. You will need to make a few modifications to this file.

2. Do not open the file by double-clicking, that would open it with the XML editor. Instead, right-click the file and select Open With > Text Editor.
3. Provide a valid name and version for your application. The name can be changed by editing the <name> element near line 25.
4. Type some descriptive text that identifies your application. For example, you might type Slashdot RSS Monitor or something similar (see Figure 25). Note: The exact line number and comment text may differ from those shown.

Figure 25. Changing the <name> element.
5. Next set the version number for your application. If you decide you are a great coder and there is no chance of any bugs, you might choose version 1.0. Set this value in the <versionNumber> element near line 30 (see Figure 26).

6. Next, you’ll want to define where the main application can locate the proper PNG application icons. Near line 109, find the <image16x16> element, which begins a set of six similar elements (see Figure 27).

Figure 27. The icon elements before editing.
7. Insert the name of the appropriate icon file in each element (see Figure 28).

Figure 28. The icon elements after editing.
There are many other items that may be set in the application descriptor file including descriptions, copyright, and more. For more information, refer to the Adobe AIR documentation.
8. Save your changes.
9. If you have not already done so, copy the necessary icon PNG files from the starter project into your project’s src/icons folder.
10. Right-click the project in the Package Explorer and select Export.
11. In the Export dialog box, select Flash Builder > Release Build (see Figure 29).

Figure 29. Exporting the release build.
12. Click Next.
13. On the next screen, ensure you’re exporting the correct project and leave the other options at their default values (see Figure 30). Click Next.

Figure 30. Specifying the export folder.
14. On the next screen, specify the location of your digital certificate and type the password. Make sure that the certificate you created complies with the requirements of the Android Market. Again, for instructions on creating such a certificate, see Generating a PKCS12 certificate for Android Market.
15. Click Finish.
That’s it! When you see the success confirmation (see Figure 31) you will have a new *.apk file (which is the native installer package for Google Android devices).

Figure 31. Confirmation of a successful release build export.
Where to go from here
Congratulations! You are now a mobile developer!
I encourage you to try your hand at developing your own mobile applications using Flash Builder and the techniques you’ve learned in the article.
For more information on Flex mobile development see the following resources:
• Flex Test Drive for Mobile: Build a mobile application in an hour
• Mobile Application Development with Flex
• Video of this tutorial: Part 1 Part 2