In this tutorial we will learn how to talk to Neo4J using
Java. There are a few tutorials from Neo
Technologies which are very useful however I have my unique style of teaching
and want to explain this technoracle-style.
First, if you haven’t already familiarized yourself with Getting Start with Neo4J and the Getting Started with the Neo4J Cypher Shell, check out those two articles.
Here are the steps to communicating with Neo4J from a Java environment. This tutorial should take you about 30 minutes to complete.
SETUP
1. Ensure you have the right version of Java and the Java JDK environment set up properly. On a Mac, this is probably already done for you. On a PC, you might have to manually download and install the right version of Java and set the PATH and JAVA_HOME environmental variable from scratch.
2. Download and install Neo4J. In this tutorial I am using Neo4J 1.8 M01 release. I installed it on my OSX 10.7.3 laptop under my home directory (/Users/dnickull/Software/Neo4J_1.8/)
3. Ensure you have the correct version of Eclipse installed. For this tutorial, I downloaded Eclipse Indigo Service Release 1, Build id: 20110916-0149. I use the version entitled Eclipse IDE for Java EE Developers.
STARTING THE PROJECT
4. Within Eclipse, select File -> new -> Java Project and give the new project a name. In my case I m calling mine “Neo_1.8”. Select Next.
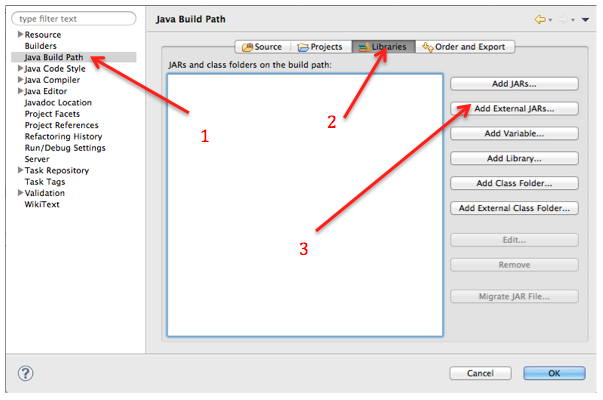
5. Under the second new project page, select Java Build Path (1) the libraries tab (2) and then click on Add External Jars (3). This will allow you to browse for external jar files.
First, if you haven’t already familiarized yourself with Getting Start with Neo4J and the Getting Started with the Neo4J Cypher Shell, check out those two articles.
Here are the steps to communicating with Neo4J from a Java environment. This tutorial should take you about 30 minutes to complete.
SETUP
1. Ensure you have the right version of Java and the Java JDK environment set up properly. On a Mac, this is probably already done for you. On a PC, you might have to manually download and install the right version of Java and set the PATH and JAVA_HOME environmental variable from scratch.
2. Download and install Neo4J. In this tutorial I am using Neo4J 1.8 M01 release. I installed it on my OSX 10.7.3 laptop under my home directory (/Users/dnickull/Software/Neo4J_1.8/)
3. Ensure you have the correct version of Eclipse installed. For this tutorial, I downloaded Eclipse Indigo Service Release 1, Build id: 20110916-0149. I use the version entitled Eclipse IDE for Java EE Developers.
STARTING THE PROJECT
4. Within Eclipse, select File -> new -> Java Project and give the new project a name. In my case I m calling mine “Neo_1.8”. Select Next.
5. Under the second new project page, select Java Build Path (1) the libraries tab (2) and then click on Add External Jars (3). This will allow you to browse for external jar files.
6. Browse to the directory you installed Neo4J under and look under the “libs” directory.

7. Click on one of the *.jar files under that directory and hit the mnemonic key to select all (Command –A on OSX, Control A on PC). Click Add and Finish (even if you're not from Finland ;-).
8. In Eclipse, right click (Control click on PC) on the “src” folder of your newly created Eclipse project and select New -> Package. In the dialog window, add a new package name. In the figure below, I added com.technoraclesystems.neo4jutils. Hit the Finish button.

9. Right click (PC) or Control Click (OSX) on the newly created package name and select “New -> Java Class”. Provide a name for your class. In the example below I created a public class called HelloNeo4J. Click Finish

10. Add the following import statements into your project.

11. Next we have to create the path to the actual Neo4J instance you installed. This is done with one line of code. Just below the class declaration, add the following line replacing the path with your path to the Neo4J 1.8. Note that the path on a PC will use the “\” chafacter instead of the “/” character and you will also have to escape it by placing a second “\” in front of each path separator. THis should be the first line under your public class HelloNeo4J { statement.
12. For this simple tutorial, we will create 5 new class member variables as shown below on lines 19 - 23. Note that I have closed the imports statements but Eclipse keeps the lines numbers intact.

a. myString – concatenates various strings to print back to the console
b. graphDB – an instance of Neo4J to work with
c. myFirstNode – a neo4J node
d. mySecondNode – a second neo4J node
e. myRelationship – the simple relationship between the two nodes.
14. The next item to create is a static method to declare the list of relationships In this case we are using the word “KNOWS”, which sub-types the neo4J interface RelationshipTypes (API Docs).

15. A relationship type is mandatory on all relationships and is used to navigate the node space. RelationshipType is in particular a key part of the traverser framework but it's also used in various relationship operations on Node. RelationshipType is designed to work well with Java 5 enumerationss. This means that it's very easy to define a set of valid relationship types by declaring an enum that implements RelationshipType and then reuse that across the application.
16. Now we need to implement our main() method. The main method has 3 basic parts. The first is to instantiate myNeo4JInstance, an embedded instance of Neo4J. There are then consecutive calls to createDb(), removeData() and shutdown(). Add the stub code for these methods.

17. The first method to complete will be the createDb(). Add the following lines of code to this method.
NOTE: This is a bare bones, minimal tutorial. In production, there are several other items to take care of such as registering a shutdown hook to ensure the database stops properly. This would normally be done at this stage. Read more about the importance of the shutdown hook here - http://docs.neo4j.org/chunked/stable/tutorials-java-embedded-setup.html

THE TRANSACTION
18. The first line calls the GraphDatabaseFactory method to create a new instance of the embedded Neo4J which takes one argument, the DB_PATH we set up earlier. The second line start a new transaction named tx.
19. The next line will set up a new Transaction with the identifier “tx” and calls the graphDB’s createNode() method. The transaction basically has two main parts:
try {
//Some logic
tx.success
} finally {
tx.finish();
}
20. The idea is that your application logic goes under the try. All your application logic should be executed before the tx.success() statement. If all goes well, tx.success marks the transaction as successful but does not actually commit it. This is only done when tx.finish() is called. If tx.falure() is thrown during the logic phase, the database is rolled back. This is about as simple and elegant as it gets.
Here is how our logic will go to create a very simple graph of two musicians who know each other.

21. Lines 44 and 45 set properties for myFirstNote while lines 46-47 do the same for mySecondNode. Starting on line 49, a relationship is created between those two nodes using the type from our Java enum, namely "KNOWS". This is all printed to string before tx.success() is called. tx.finish() is where the transaction is actually committed.
22. Next we will tackle the removeData() method, which will be executed next in the main method. This essentially undoes all the work we just completed. Modify the contents as follows. Note that this uses the exact same transaction construct as when we created the database.

23. Line 70 basically provides a start context for the transaction by looking for myFirstNode and calls the delete() method on the relationship. The same delete() method is then called on both other nodes.

RUN THE PROJECT
25. That is it! If you run your project, all should go well and you should see the following in your console.

If you would like the source code for this project, please email me duane at nickull dot net. Also, this is very important to remember. This is a very basic tutorial. It is very important to learn about other methods and hooks such as the synch hook, shutdown hook and how to clear the database in order to use Java safely with Neo4J. There is a great tutorial at http://docs.neo4j.org/chunked/stable/tutorials-java-embedded.html that explains more and the Java API docs are at http://api.neo4j.org/1.8.M01/.
SOURCE CODE
package com.technoraclesystems.neo4jutils;
// From the //neo4j_install_dir/lib directory
import org.neo4j.graphdb.Direction;
import org.neo4j.graphdb.GraphDatabaseService;
import org.neo4j.graphdb.Node;
import org.neo4j.graphdb.Relationship;
import org.neo4j.graphdb.RelationshipType;
import org.neo4j.graphdb.Transaction;
import org.neo4j.graphdb.factory.GraphDatabaseFactory;
public class HelloNeo4J {
private static final String DB_PATH = "/Users/duanenickull/Software/neo4j-community-1.8.M01/";
String myString;
GraphDatabaseService graphDb;
Node myFirstNode;
Node mySecondNode;
Relationship myRelationship;
private static enum RelTypes implements RelationshipType
{
KNOWS
}
public static void main( final String[] args )
{
HelloNeo4J myNeoInstance = new HelloNeo4J();
myNeoInstance.createDb();
myNeoInstance.removeData();
myNeoInstance.shutDown();
}
void createDb()
{
graphDb = new GraphDatabaseFactory().newEmbeddedDatabase( DB_PATH );
Transaction tx = graphDb.beginTx();
try
{
myFirstNode = graphDb.createNode();
myFirstNode.setProperty( "name", "Duane Nickull, I Braineater" );
mySecondNode = graphDb.createNode();
mySecondNode.setProperty( "name", "Randy Rampage, Annihilator" );
myRelationship = myFirstNode.createRelationshipTo( mySecondNode, RelTypes.KNOWS );
myRelationship.setProperty( "relationship-type", "knows" );
myString = ( myFirstNode.getProperty( "name" ).toString() )
+ " " + ( myRelationship.getProperty( "relationship-type" ).toString() )
+ " " + ( mySecondNode.getProperty( "name" ).toString() );
System.out.println(myString);
tx.success();
}
finally
{
tx.finish();
}
}
void removeData()
{
Transaction tx = graphDb.beginTx();
try
{
myFirstNode.getSingleRelationship( RelTypes.KNOWS, Direction.OUTGOING ).delete();
System.out.println("Removing nodes...");
myFirstNode.delete();
mySecondNode.delete();
tx.success();
}
finally
{
tx.finish();
}
}
void shutDown()
{
graphDb.shutdown();
System.out.println("graphDB shut down.");
}
}
Enjoy and have fun!